Rotating diamond tutorial
June 15th, 2020
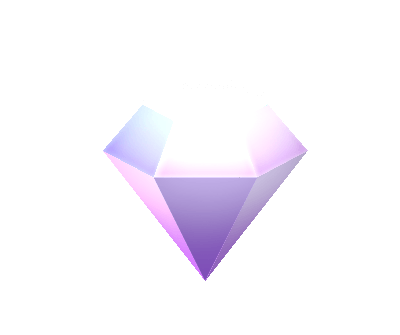
In this blog post we will create a rotating diamond animation using only weights and bones, without any deform keys. This advanced tutorial requires the use of Spine Professional.
To achieve this rotation effect, the skeleton combines the use of perspective rotations, weighted meshes and exact mesh vertex placement by copying and pasting vertices.
Setup
You can download the project to follow along, as well as to see the final result here.
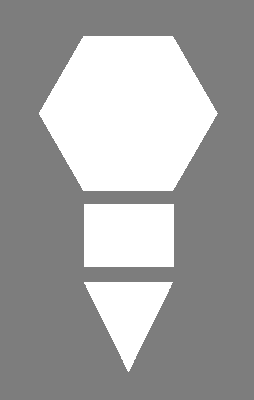
To begin the creation of our diamond, we need to import 3 main shapes in Spine: the top as seen from the front top, the upper square side upper-side, and the lower triangle side lower-side. We will later refine the images to add a color gradient and add a separate shimmer image, but to keep things simple as we start, we will only create a new Spine project and import these 3 shapes as illustrated:
After importing these images into Spine, we can start creating the bones to control them.
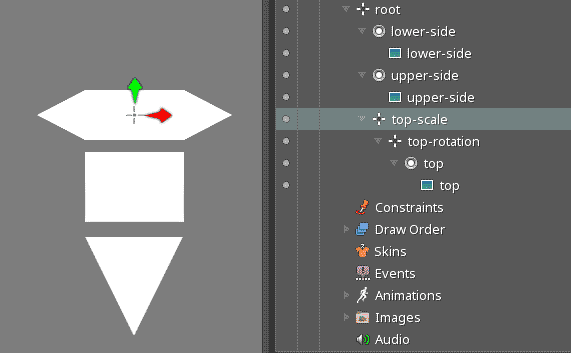
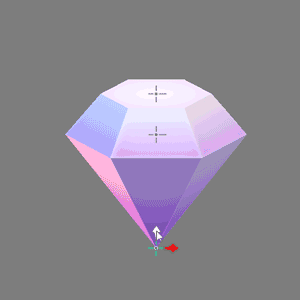
The final structure of this skeleton is actually simple, it only requires 5 bones to work. The objective is to create a structure that rotates in perspective for the first two sections: the top and middle of the diamond, which can be achieved by using 2 bones for each section, then have a third section at the bottom which is used to control the tail of the diamond.
Rotating in perspective
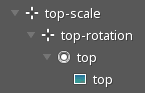
The first step is to create a section that rotates in perspective, just like the windmill blades in the windmill example project. To achieve this, create two bones that overlap each other, one a child of the other, then parent the slot called top containing the hexagon image attachment to the child bone so that the bones are in the exact middle of the image. You can ensure this by selecting the top attachment and, with the parent axis selected, change both the translation values to 0.
The parent bone is the one in charge of scaling the structure, therefore let's call it top-scale. The child bone is in charge of rotating so its name is going to be top-rotation.
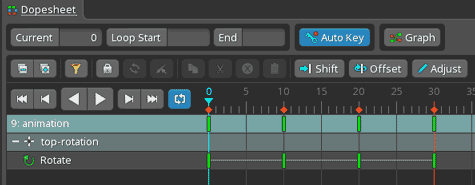
Next, switch to animate mode and create an animation that does a 360° rotation using the bone top-rotation. To achieve that, set 4 equally distanced keyframes with the rotation values 0°, 120°, 240° and lastly 0° again to loop the animation.
It's important to create the rotation animation now, because after scaling the parent bone the values of the rotation keyframes will change after being distorted by the scale. If the rotation is done after scaling, using the values above will not produce the desired result.
After the rotation is ready, go back to setup mode and scale the bone top-scale only vertically. In this example the scale values are set to 1 and 0.3, but this amount can be changed to achieve different perspectives. If this is done in animate mode it can simulate changing the angle of view or even changing proportions as in the initial GIF.
For now, let's just duplicate top-scale so that also its children are duplicated. Place the copy just below and rename the two bones to middle-scale and middle-rotation, then scale top-rotation uniformly down a little so that the proportions look more like the top section of a diamond.
The new middle section is not going to be visible in the final diamond, but it's going to be fundamental for the next step.
Exact vertex placement
Now that we have two sections rotating in perspective, we are going to use them as references to position each side of the diamond by copying the vertex positions of the corners and pasting them on the side images so that they will match their positions exactly.
To do so, first convert all the region attachments into meshes, then create the tightest possible meshes for each image so that each vertex is placed on a corner. This is important to avoid gaps between the diamond sides. The mesh trace feature can help to compelete this step very quickly.

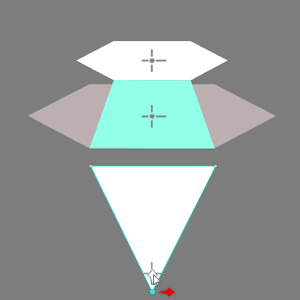
For the sake of clarity, different colors have been temporarily applied to the attachments. The result should be similar to the one below.

Once all the meshes are ready, we can start matching the various vertices to create the sides of the diamond, one slice at a time. Select the two bottom middle vertices of the top hexagon image by pressing ctrl (cmd on Mac) and, while having the world axis selected, press ctrl+C (cmd+C on Mac) to copy the positions of the two vertices. Next, select the two top vertices from the upper-side mesh following the same selection direction used to select the previous two vertices, then press ctrl+V (cmd+V on Mac) to paste the vertex positions.
Repeat the process for the two bottom vertices, this time select the two bottom middle vertices of the middle hexagon image, copy the two vertex positions, and paste them on the two bottom vertices of the upper-side mesh.
![]()
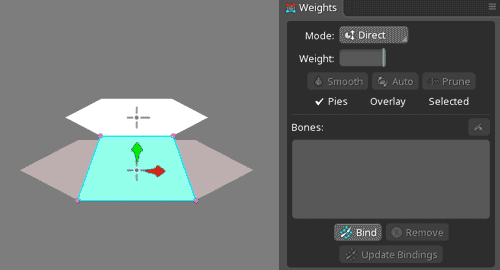
To ensure the vertices will follow the rotation of the bones we previously set, we need to bind the mesh to the bones top-rotation and middle-rotation, then change the weights of the mesh so that the two upper vertices that are touching the top hexagon image are set so that they are influenced 100% by the bone top-rotation, while the two lowest vertices should be influenced 100% by the bone middle-rotation.
The lower triangle side called lower-side is going to receive the same treatment for the two upper vertices, while for the bottom vertex we can just create a new bone called lower-point and manually center the bottom vertex to it.
The lower-side mesh can then be bound to the bone middle-rotation influencing the two upper vertices at 100%, and to the bone lower-point influencing the bottom vertex at 100%.
With this, the first slice of the diamond is ready, and if we play the animation we created earlier, this should be the result:

Adding new sides
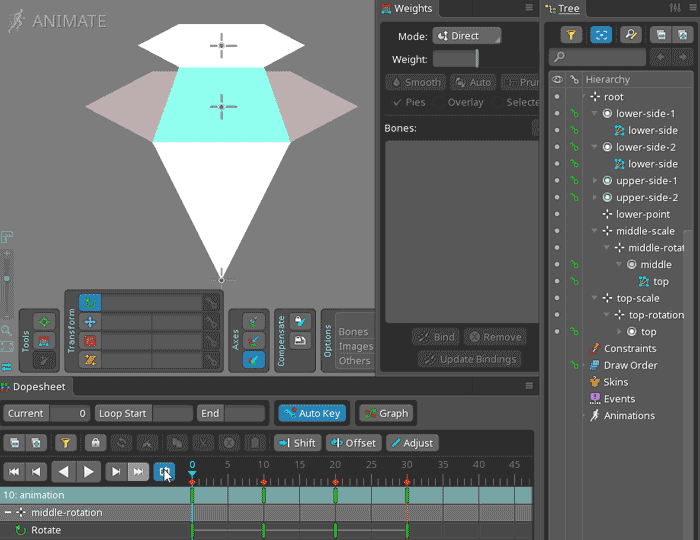
To add another slice to the diamond we need to duplicate the two upper-side and lower-side meshes, switch to animate mode, then choose a frame from the timeline so that the side we want to add is clearly visible, then repeat the process of selecting the vertices from the top hexagon, copying and pasting their positions on the duplicated side.
Since the mesh is already bound to the bones we need, this time we are going to press Update bindings to discard the old binding positions for the mesh and replace it with the current positions. However, modifying the vertex positions in animate mode has caused Auto key to add a deform key. Delete that deform key to restore the correct mesh position after updating the bindings.
Repeat the process of duplicating the two meshes and binding each new side to the correct vertices until all the diamond sides are in position and weighted correctly. After this the middle hexagon image can be discarded as it isn't needed anymore.
Draw order and colors
The next step consists of adjusting the draw order during the rotation animation. The best time to change the draw order is likely when the new side that should come to the front is about to be revealed. Sometimes this happens on a keyframe, sometimes the exact moment can be captured more easily by holding shift and dragging the timeline to place the draworder keyframe on a non-integer frame.
The slot colors add the possibility to create a shimmering effect by simply choosing different colors for the same slot during the animation. For example the same side can go from pink, to purple, to green. This is left to your artistic sense!

The placeholder colors and simple textures can also be replaced with more detailed textures and animated slot colors. The images can be repainted and replaced directly in the images folder -- Spine will automatically update the project to use the new images.

Adding a glow image

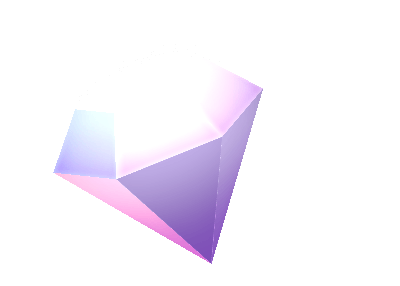
The rotating diamond is now complete, but you can add more details like sparkles, or a glow image with additive mode to turn on when the side is facing the viewer to simulate an additional shimmer, as was done here. The glow can even be weighted to the scaling bones of the diamond so that it follows any change of proportions you may decide to add.
Alternative proportions and perspectives
It is possible to achieve different proportions by scaling the bones top-scale and middle-scale and translating those bones and the lower-point bone. If done during an animation this can simulate a tilt in the spin, such as in the example below.
Conclusion
This advanced technique can be applied to any geometrical object with flat surfaces, so you can potentially create rotating cubes, pyramids, or even bottles, vases, lamps, chests, gift boxes, stars, books, and so on. We love to see what you create, so don't forget to tag your creations using #madewithspine! Let us know your thoughts on the Spine forum.