- Uređeno
runtime attachments?

Hello, I'm interested in this:
Runtime Skins - Spine Runtimes Guide: Creating attachments
My project has a lot, and I mean a LOT, of attachments and skins. So if I understand it right, it is possible to have just one attachment in Spine and swap it with, say, recolored artwork via code. Is it also possible to tint attachments in this way?
Anyway, in short: how is this done? 

This page shows you a list of options: Spine-Unity Mix and Match
Important things to note:
Skins are a collection of attachments used by a skeleton.
The skins (and the attachments in them) are loaded from the json and are shared across all skeleton instances.
In your case, what you would do if you just wanted a different-colored attachment for your character without affecting others,
You would create a duplicate skin.
Duplicate the unique attachments.
Set the color of those duplicated attachments. Each renderable attachment has R, G, B, and A properties to store its color.
That page also shows how you can use Unity sprites to remap onto duplicate attachments.
The Mix and Match example scenes and code included with the unitypackage also shows how this is done.
mjesec kasnije
Thanks, checking it out and we may be back with more questions 
Hello, we're finally resuming this. I think we're getting it to work but it seems you can't use a regular mesh attachment as template, only skin placeholders work? Is that so?

Could you elaborate why a regular mesh can not be used? There are no skin placeholders at runtime, at least not in the same way as you find them in the editor.

Let me chime in as well, I am working with Fainder but I am on the Unity side. We are using skins for characters, and to do costumes we change out attachments on certain slots, like "costumes-body" slot gets set to "body_T-shirt_green". The lengthy part for Fainder at the moment is adding every costume attachment (in the Spine Editor) to every character skin so that inside Unity I can do the SetAttachment("costumes-body", "body_T-shirt_green"), regardless of what 'character' skin the player is using.
So we looked into run-time attachments and made some good progress. But it seems like when I am getting the placeholder attachments on a skin via "skin.GetAttachment()", I only see certain ones, which correspond to the coat-hangers in the Unity skeleton preview:

Eg when doing this:
 In this case, body_suit_white works, because it's one of the coathanger ones in Unity preview. But if I tried to use any of the t-shirts there, it would come back as null.
Also on a related note, I like using the images baked into the atlas already (rather than adding sprites to Unity individually), but it seems like you cannot get an atlas from a Skeleton or SkeletonData? I ended up using a public var and setting the atlas in that. My basic test looked roughly like this (after getting the body slot and template attachment):

on my side it looks like:
http://prntscr.com/m7d4ej
http://prntscr.com/m7d4ps

I'm not sure I understand the way you are trying to implement this, but it seems as if you are using skin placeholders the wrong way. Why are you using one skin placeholder per colored item?
Quoted from here Skins - Spine User Guide: Skins, the usual workflow would be to have one skin placeholder per clothing-part:
The skin placeholder will hold the attachment for each skin, so its name does not need to indicate which skin it is for. Instead, the skin placeholder name should indicate only what the attachment represents. For example, if you have a "red" and a "blue" skin, "head" would be a good skin placeholder name for the head, not "red head" or "blue head".
Be sure to look at the page that pharan mentioned:
Spine-Unity Mix and Match
and also
Runtime Skins - Spine Runtimes Guide: Grouping attachments
and
Skins - Spine User Guide: Combining skins
@pixilestudios thanks for the additional information! The problem is that some of the attachments are in the skins that you fetch with skeletonData.FindSkin(equippedCharacter.characterSpineSkinName), while others are in the default skin.
For example, this is from @Fainder's screenshot of the Spine editor side setup:
body_spring-dress_red and body_spring-dress_yellow are not part of a skin. Instead, they are direct attachments in that specific slot. These direct attachments are stored in the default skin.
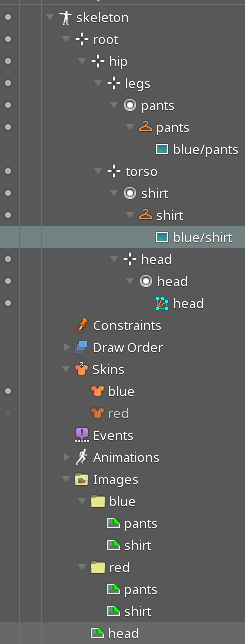
Let me try to illustrate this with a simpler example:
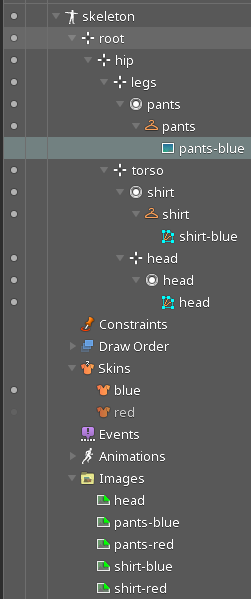
This is the (simplified) skeleton of some character. It has legs with customizable pants, a torso with customizable shirt, and a head that's not customizable. In the example above, the blue skin is active. Each skin placeholder thus shows the attachment assigned to it while the blue skin was active.
Here's the same skeleton with the red skin active:
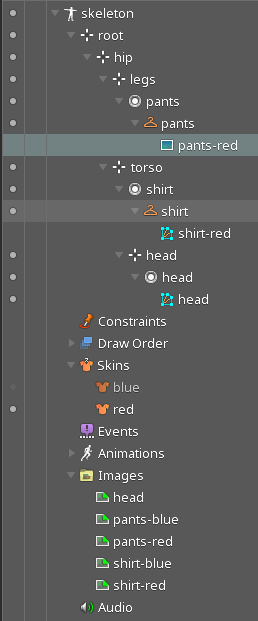
The head attachment stays where it is, as it is not in a skin placeholder, but directly attached to a slot. However, attachments of the pants and shirt placeholder have changed to the ones assigned while the red skin was active.
This is one way to setup customizable characters, where each skin represents a set of attachments for one specific set of full clothing. There are other ways to organize skins for customizable characters. We can get into that in follow up posts.
Also note the images node which shows all the images used in the skeleton. When you create an atlas for this skeleton with the default settings, all those images from different skins will get packed into a single atlas. When the image of an attachment is resolved while loading a skin, it's name is used as a unique identifier within the atlas to locate the image. That's why we have shirt-red and shirt-blue as image names.
Here's the exported JSON which shows you which skin contains what attachment (i've replaced some parts of the JSON with ...).
{
"skeleton": { ... },
"bones": [ ... ],
"slots": [
{ "name": "shirt", "bone": "torso", "attachment": "shirt" },
{ "name": "head", "bone": "head", "attachment": "head" },
{ "name": "pants", "bone": "legs", "attachment": "pants" }
],
"skins": {
"default": {
"head": {
"head": {
"name": "head",
...
}
}
},
"blue": {
"pants": {
"pants": {
"name": "pants-blue",
...
}
},
"shirt": {
"shirt": {
"name": "shirt-blue",
"type": "mesh",
...
}
}
},
"red": {
"pants": {
"pants": {
"name": "pants-red",
...
}
},
"shirt": {
"shirt": {
"name": "shirt-red",
"type": "mesh",
...
}
}
}
},
"animations": {
...
}
}
Note how the skins section actually has 3 skins: default, red, blue. In each skin, we find attachments. To get to an attachment, we need: the skin name, the slot name, the attachment name, and finally the name of the image in the atlas (or some other place to fetch the actual image from). E.g. default -> head -> head -> head.
You can also see, that the concept of skin placeholder has completely vanished in the exported JSON. Instead, we see what slots the skeleton has, and what attachments are on each slot (see the slots section in the JSON). The attachments are only referenced by name there. The skins in the skins section in the JSON are each merely a set of mappings from slot name to attachment name to image name in the atlas!
Note how the red and blue skins do not contain an attachment for the head slot! That's because that head attachment is not in a skin placeholder, but directly attached to its slot head. Since it is not in a skin placeholder, it goes directly into the default skin. But that is only an editor side distinction really. At runtime, the attachments are fetched from the active skin (or the default skin, if no active skin is set, or the attachment can't be found in the active skin. See the Skeleton#GetAttachment method).
Now, in your setup, you are trying to fetch a default skin attachment from a non-default skin. This is similar to trying to find the head attachment in red or blue skin, and will result in null being returned. You have to query default skin for the head attachment.
How do you get to the default skin? Same as you do for any other skin:
Spine.Skin defaultSkin = skeletonData.FindSkin("default");
Coming back to your first problem: all your t-shirts are inside the default skin. When you try to fetch them from the current character skin, which is not the default skin, null will be returned. But since they are in the default skin, and since when attachments are resolved the default skin will be the fallback lookup, you do not need to add this default skin attachments to your custom skin!
Which leads me to you general skin setup:
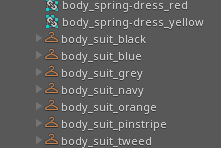
Image removed due to the lack of support for HTTPS. | Show Anyway
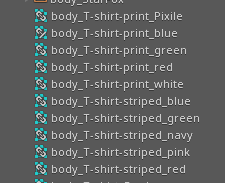
This is not good. From those screenshots, I can see that you have different item categories, e.g. t-shirt, suit. But instead of having a single skin placeholder for each item category (like shirt and pants in my example above), you use one skin placeholder per item (body_suite_black, body_suit_blue, etc.).
Also, for some item categories, you aren't using skin placeholders at all! E.g. all the body_T-shirt-xxx items are directly attached to the slot, and all go into the default skin (which is why fetching them from a non-default skin returns null btw).
There are different ways how to organize your skins and skin placeholders. Let me assume the following:
You have full outfits, e.g. a red outfit, a santa outfit, etc. These outfits consists of multiple attachments, e.g. one for the shirt, one for the pants, one for a hat (which might not exist in some outfits).
You want the user to be able to freely mix items from multiple outfits into a single new outfit.
As a first step, think about all the item categories a custom can possibly be composed off. An outfit might consist of the following:
Shoes (left & right)
Pants (left & right, possible in 3 sections for the lower leg, upper leg, and hip area)
Shirt (again multiple sections, e.g. torso, left upper arm, left lower arm, right upper arm, right lower arm)
...
For each of these items, you create one or more skin placeholders (depending on the number of sections an item can be composed of). Note the absence of concrete identifiers like red, or pirate in these skin placeholder names. Per item (section) there is only one skin placeholder!
Next, you create a folder, one for each outfit. In this folder, you place the images to be used for the item (section) attachments for this outfit. E.g. for a red outfit, you'd have an image for the left and right red shoe, images for the left & right sections for the red pants, images for the sections of the red shirt, and so on. The images will have paths like red-outfit/shoe-left.
Next, create a new skin for the outfit and make it active. Drag the images to their corresponding skin placeholder. Here's a trivial example:
Note that a skin does not necessarily need to have attachments for all skin placeholders! E.g. a male bathing suite might not have any shoes or shirt. In that case, the skin placeholders are empty.
And that's it! Of course, you can also use meshes, and even linked meshes if you use mesh free-form deformations in your animations and want to share that FFD animation across different skin attachments.
But the important part is that you have one skin placeholder per item category (and possibly subsections), and a nicely organized folder hierarchy for the source images of attachments. You can also just pack that entire image folder with sub-directories into a single atlas (provided you don't have thousands of huge source images, which requires a much more complicated on-demand-loading solution for atlases and skins).
At runtime, you present the user with all possible items from all available skins. To get to all those items, walk through all the skins and their respective attachments and display them in a customization UI. For each selected item, you note down the skin it comes from, the slot it goes onto, and the attachment name. With that information in hand for all selected items, you fetch the attachments from the respective skins and combine them into a single skin, like you already do.
The setup above is outfit centric. You can also turn it on its head and make it item category centric. Instead of having one image folder per outfit (red, pirate, ...), you have one image folder per item category (shoes, pants, ...). But the basic principles still apply.
In summary:
Refamiliarize yourself how skins, skin placeholders, and attachments work both in the editor, as well as at runtime.
Based on that understanding, reconsider and possibly rework your current skin and skin placeholder setup.
If you are early enough in the development process, fixing your current setup will pay off immensely later on down the line. On our end, we will try to add more documentation about workflows for customization on both the editor and runtime side.
I understand what you're suggesting with the use of skin placeholders, but that's not viable in our case. Skins are already different characters that can be dressed up in many ways. This isn't a single character with different outfits, I have skins for different animals that are normally naked and all the clothes attachements you see there can be applied to every skin.
As you mentioned, we want to be able to mix and match clothing items, so I have grouped them into slots. Some are set to default skin because they fit all animal skins (like t-shirts, since they cover the body that is shared among all skins), some are set per skin because they need to be adapted to different animals (example: hats. not all animals have the same head shape and I adjust the hat position for each one of them). hence my file hierarchy
...or, we have a lot of possible outfits, some clothing items may even be just one image in different recolored versions. I'd end up with hundreds of skins if I made each clothing item into a skin
(I'm talking editor side only here)
basically, what I've done is the opposite of what you're saying: clothes are (mostly) default, and each skin defines different characters to go underneath them, instead of a default character with different outfits set as skins.
Thanks for the detailed responses! With what Fainder mentioned, this is why we were doing it the current way... and are finally now trying to switch to templates / run-time attachments. Things kind of multiplied over time.
Sounds like we are okay, but that I just need to pull template attachments from the default skin if it's not in the current character skin. And meanwhile Fainder would put a template/placeholder of each costume type in each costume slot. Ie body slot would have a generic template suit/shirt/tshirt/etc attachment that I can clone... and then we would have every actual image we need just sitting in the atlas in a region, ready to be swapped in as needed via my Unity code.